Showing posts with label recipe. Show all posts

Tuesday, February 5, 2013

Valentine's English Muffins

 My kids (and husband) love to have Egg McMuffin (minus the Mc) sandwiches in the morning for breakfast.  Pretty much every morning we are breaking out the English Muffins or the bagels to make an egg, ham, and cheese sandwich. 
A couple years ago I printed off a recipe for heart shaped English Muffins from Family Fun's website.  When we were out of English Muffins, I thought I would try the cute little Valentine heart ones because I had never made English Muffins before, and I was curious.  They were really easy, but with the rising time, were not done in time for breakfast!  :)  You can find the recipe here.  It was fun, and cute--- but to be honest, we prefer the store bought muffins.  Most things taste better homemade, but while these were fine, it is a recipe I would only make again for the cute heart factor, not for the taste. 
I couldn't find my regular heart cookie cutter and had to use the scalloped one.  I wondered how they would turn out.... but it was funny to see the scallops almost disappear as the dough rose and cooked.  Right after putting them on the corn meal sprinkled skillet, they started to puff up!   

Browned on one side, they are starting to look like English Muffins!
And here is the other side- they definitely look like heart shaped English Muffins.  My kids thought they were cute. 
And the taste test..... well--- they were more just heart shaped bread.  They didn't really have the flavor or texture of English muffins.  Where most English muffins are light and have big air pockets in the bread, these were dense, like regular bread.  Which is still totally fine.....just not an English muffin like we are used to!
A couple of tips for all of you out there.....since my kids (and hubby) like these pretty much every day, I had to come up with something easier and better than cooking the eggs in a pan every day.  I found out that if you use a bowl- these Anchor (2 cup sized) glass bowls work perfectly, they make the egg perfectly round and perfectly the size of an English muffin.  Just spray the bowl really well with cooking spray, and crack one egg into it.  Use a fork to scramble the egg, and put it in the microwave on high for 1 minute.  If I don't scramble it well enough, it will sometimes pop a little while cooking, but it's not a big deal.  I usually stick the English muffin in the toaster, then work on the egg, and by the time the toast is out and buttered, the egg is done and ready to turn over onto the toast.  Topping with a piece of cheese and a couple slices of ham, you are done in about 2-3 minutes with a nice, easy, warm breakfast!  Easy Peasy!
 
Another tip for all of you..... we like the Thomas brand of English muffins.  But, we had the problem of them drying out before we finished the box, even when trying to keep the plastic bag closed.  The solution to that problem was easy, too. 
When I buy them at the store (usually Sam's Club or Costco), I take them home and slice them so I don't have to wash the bread knife every day.  So I slice them all at once. 
Then I put the sliced muffins back in the bag, and toss the box in the recycle bin.  The muffins can hang out with your bread on the counter, or after slicing and bagging them, I will put them in the freezer, and just pull out a few days' worth at a time.  No more stale muffins, and no wasted moldy muffins= awesome.
 

Monday, January 14, 2013

Preventing Food Waste- "Sun" Dried Tomatoes

Have you ever bought one of the large clam shell boxes of grape tomatoes from Costco or Sam's Club?  I love the Cherubs, but Sam's Club was out of them, so this time it was Zima- orange grape tomatoes.  They are both so sweet!  But when I buy that many, it always seems like they start to wilt before we can use them all.  I didn't want to freeze them (our freezer is packed enough as it is), so I decided to try to dry them in the oven-  to see if they would be sort of like sun dried tomatoes.  Guess what?  It worked, and it worked well! 

When you notice your tomatoes beginning to wilt (the skin starting to pucker), just wash your tomatoes as you normally would before eating them.  Then slice them in half.  Turn on your oven to the lowest temperature- I believe mine was set at 170 degrees.  I put my metal cooling rack on top (lightly sprayed with Pam) of a cookie sheet and placed the tomatoes on, cut side up.  Then I lightly sprayed them again with Pam, and then sprinkled them with sea salt and freshly ground pepper.  Put them in the oven for a few hours.  I began checking mine after about an hour, and about every half hour after that.  They took a good part of the day to dry out.  It is important to keep checking them, though, because some will dry faster than others.  When you check, if there are any that are done, pull them off and let them cool.   
These are red- they are the Cherub kind.  The Zima's turned out orange because they were orange to begin with!  When all the tomatoes are dry, let them cool and put them in a plastic ziploc freezer bag.  You can use these as you would any sun dried tomatoes, but I really like them in pasta dishes.  They add a little sweet tang to pasta that is really good!  You can keep them in the zip bag in the pantry if you dried them fully, or you can keep the bag of dried tomatoes in the freezer, ready to use at any time.  They will at least use a lot less space since they are dried!   Enjoy!
 
I also decided to include a recipe we like that uses the tomatoes.
 

Ranch Chicken with Bacon and Sun Dried Tomatoes

6 chicken breasts (boneless, skinless, trimmed)
6 strips of bacon, cooked crisp and crumbled
1 pkg. Hidden Valley Ranch mix
1 can cream of chicken soup
1 cup Naturally Yours fat free sour cream (If you can't find Naturally Yours, then the Daisy light or fat free will work, too.  If you don't have either of these available, I'm sorry-- but you'll want to use the full fat kind in any brand.  The other brands of light or fat free sour cream just are too gross to be worth using!)
1 lg. or 2 small cloves of garlic, minced
1/4 to 1/2 cup evaporated milk
1/2 cup sun dried tomatoes
 
Spray the inside of a crock pot with cooking spray.  Mix the cream of chicken soup, sour cream, milk, garlic, ranch mix, tomatoes, and half of the crumbled bacon together.  Refrigerate the remaining bacon in a baggie until you are ready to eat.  Scoop half of this mixture into the crock pot.  Lay the chicken down, then scoop or pour the rest of the sauce over the top.  Cook on high for 3-4 hours, or on low for 6-8, until the chicken falls apart easily when you go to cut it up.  I like to just break it with my fingers into bite sized pieces, but you can cut them or shred them, too.  Serve over cooked noodles/pasta, I think the more delicate egg noodles work best.  Top with remaining bacon crumbles. 
 

Friday, July 13, 2012

Creative Kids' Food- Snake Hoagie/ French Bread recipe

The kids liked making this.  We made home made French bread (this one was a double recipe), shaping the long loaf into a wavy line.  We used scissors to make cuts into the top for scales.  After baking, cut the loaf in half (a little tricky) and use to make a big hoagie.  Cut into slices to serve. 

French Bread (one small loaf)

1 1/4 Cup very warm water (not hot)
1 Tbs. sugar
1 Tbs. yeast
1 tsp. salt
3 1/2 cups Bread flour or all purpose flour

Glaze:  2 Tbs. water + 1/2 tsp. salt- mix until salt dissolves

*The dough can be made in a bread maker, using the dough program.  If you do that, run the first 5 ingredients on the dough program.  When done, place in a greased bowl, cover, and let rise until doubled.  Then follow same instructions after the first rise below.

Place warm water, sugar, and yeast in a bowl until the yeast bubbles and begins to rise- about 10 minutes.  Once it is ready, place into a mixer bowl and add salt and 3 cups of flour.  Using a dough hook, mix until all ingredients are incorporated.  Add flour until it is the right bread dough consistency, usually 1/2 cup.  Knead with the dough hook for 5 minutes.  When done, place in a greased bowl (spray with Pam) and turn over.  Cover with plastic wrap and allow to rise until doubled. 

Punch dough down.  Roll into a rectangle with a rolling pin.  Starting with the longest side, roll up tightly, pressing the end seam to seal, tapering at both ends.  Place the loaf on a greased sheet (in a wavy line if making a snake).  Cover loosely with plastic wrap and let rise until doubled again, about 40 minutes.  Preheat oven to 400 degrees.  With a sharp knife, cut shallow slashes on the top, on the diagonal (cut into scales with sharp scissors if making a snake) and gently brush the top with the salt water glaze.  Bake at 400 for 20-25 minutes, until a deep golden brown.  Remove from oven and let cool completely before cutting. 

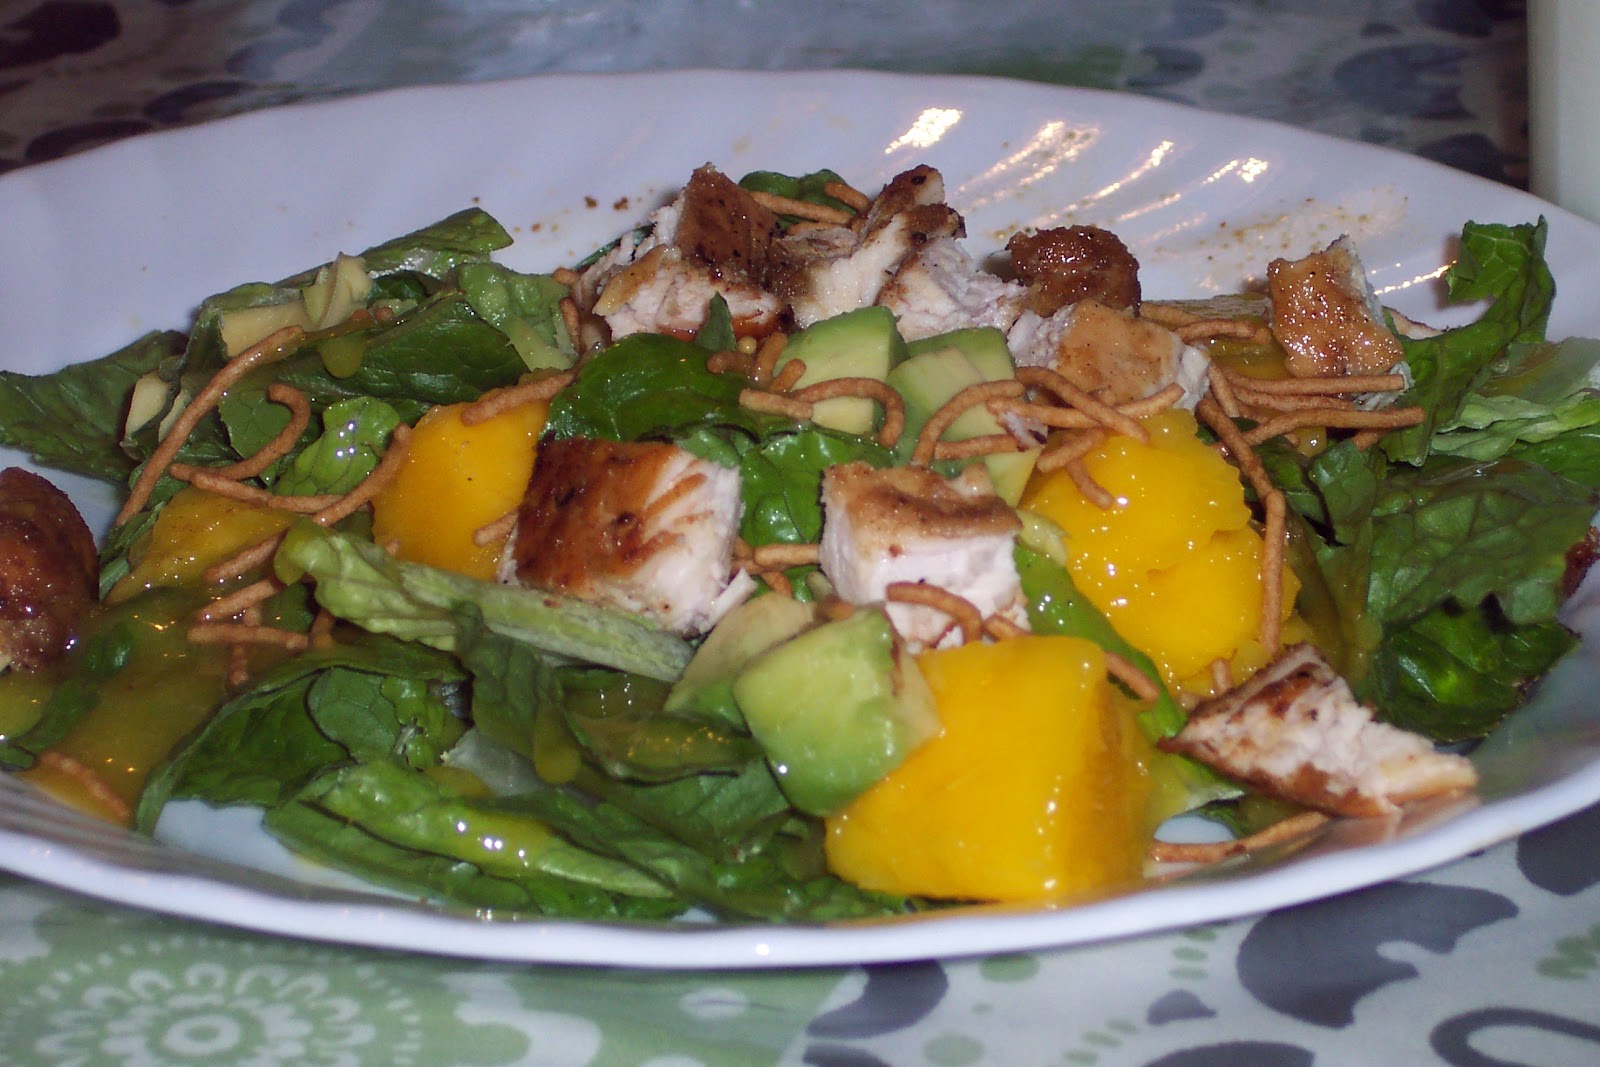
Spicy Honey Chicken Salad

It is no secret that I love Our Best Bites' recipes.  Almost a year ago, I tried their Spicy Honey Chicken Salad with mango and avocado.  Delicious!  We have had it many times since. 
You can get the recipe from Our Best Bites by clicking this link.  

Over time, I have added a few more ingredients--- and I use a different dressing.  The recipe with my changes is:

Chicken- 4 boneless skinless chicken breasts (only because it's what I always have on hand)
Rub: 2 tsp. garlic powder
         2 tsp. chili powder
         1/2 tsp. onion powder
         1/2 tsp. coriander
         1 tsp. Lawry's seasoning salt
         1/2 tsp. cumin
         1/4- 1/2 tsp. chipotle chili powder (depending on your taste and how hot the powder is)

Mix all the rub together in a large ziploc bag.  Shake with the chicken until it is evenly coated.  Grill the chicken until done, or pan fry (using 1-2 tsp. canola oil) until done. 

Stir together 1/2 Cup honey and 1 Tbs. cider vinegar.  You may need to heat the honey in the microwave to be able to stir it together.  Once mixed, divide in half.  A couple of minutes before the chicken is done, brush one half of the honey mixture over the chicken, on both sides.  Once done, cut into strips and drizzle with the rest of the honey. 

For the salad, you'll need:  (divided evenly into 4-6 portions)

Spicy Honey Chicken
Lettuce
2 mangoes, diced
2 avocados, diced
1/2 cup crispy rice noodles (not chow mein noodles)
1/2 cup almonds, glazed
several thin slices of a red onion
can of mandarin oranges, drained

Dressing:
1 mango, diced and pureed in blender
3/4 cup mayo (probably could use plain greek yogurt- I'll have to try it sometime)
1/3 cup sugar (can use honey)
3 Tbs. vinegar
1/4 tsp. salt
1/4 tsp. pepper

***I have two different brands of chipotle chili powder.  One is much spicier than the other, even though there isn't a specified difference on the labels.  You won't really know how spicy you like the chicken until you make it- and then you can adjust the amount of chipotle pepper the next time.  The first couple of times I made it, I used a powder that wasn't very spicy, so following the recipe was fine.  I wondered why they called it spicy honey chicken.   Then I made it with a different brand (not knowing that it was more spicy) and I may have spilled a little (very little) extra in, but I didn't worry about it because I knew that it wasn't very spicy in the first place!  As I served it to my friends, I told them not to worry, that it wasn't very spicy.  Only to have them just about choke with the first bite and grabbing for glasses of milk/water because it was so hot.  I was very surprised, tried it and had the same reaction.  While it is still good, if it is too spicy, it overwhelms the flavor of the mango and avocado.  It is good to find a balance where it is still spicy, but your taste buds aren't burning so you can't taste anything else! 

Wednesday, June 20, 2012

The Best Zucchini Bread, Ever!

When I was 12, a lady in our neighborhood showed a bunch of us girls how to make zucchini bread.  It was one of my first experiences with cooking/baking, and I loved it!  Especially when the result was so yummy.  I don't know if it's the sentimental memories or if it really is the best zucchini bread ever- but I haven't found a recipe that I like better.  That super nice woman has since passed away from cancer- and having her recipe means all the more to me now. 

Karen Gailey's Zucchini Bread

3 eggs, beaten
2 cups sugar
1 cup canola oil
2 cups grated zucchini (I use the large hole- side of the grater)
1 tsp. vanilla
3 cups flour
2 tsp. cinnamon
1 tsp. baking soda
1 1/4 tsp. baking powder
1 tsp. nutmeg
1/4 tsp. cloves
1 tsp. salt
1 cup walnuts, optional

Combine eggs, sugar, oil, and vanilla.  Mix in the grated zucchini. Add flour, salt, baking soda, baking powder, and spices (if you happen to add a little more cinnamon, it will be just fine- in fact, lovely).  Blend well.  Stir in chopped nuts, optional. 

Grease and flour 2 loaf pans.  Divide the batter evenly between the two pans.  Bake at 350 degrees for 45-60 minutes.  Start checking at 45 minutes to see if it's done- dip a toothpick into the middle of a loaf and if it comes out clean, it's done.  If not- and the center is still jiggly, then cook for another 3-5 minutes and check again.  At home,  it was always done at 45 minutes.  Here--- it took 55 minutes.  I have no idea why.  Altitude?  Because I wanted it to be done?   As you can see, it didn't stop me from sampling it--- before I could even get in a picture! 

Once done, allow to cool for a few minutes in the loaf pan.  Run a table knife along the side edges, loosening the bread from the pan.  Turn upside down onto cooling rack, then flip loaf back to cool right side up.  It is easier to cut when cool, but still cuts just fine while warm! 

Wrap in plastic wrap to store.  Wrap again in tin foil if you want to freeze it.  If you have lots of zucchini during the summer, you can shred and freeze the zucchini in two cup increments, to use in this recipe.  Just thaw and add in as you would normally (drain any excess liquid from freezing).